Leafscan User Guide
Overview
Leafscan is a mobile app that measures the area of a leaf (or leaves) from a picture. It lets you take a picture with your mobile device or load one from your photo library. Leafscan helps you keep track of your measurements and export them as a CSV file.
Additional features:
Measure multiple leaves at the same time in one photo
Automatically correct for pictures taken at an angle
Adjust the detection threshold for better accuracy
Include or exclude leaf holes
Customize the measurement units (mm, cm, or in)
Summarize leaf area statistics
Set up the leaf
Download the reference sheet. In order to determine the scale of the photo and correct for the perspective, Leafscan uses four reference points arranged in a square on a white background.
Enter the reference width and height. Measure the width and height of the square formed by the reference points. There’s usually a small difference between the width and height when the points are printed on paper. It’s easier to measure the distance between the edges of the points than between the centers. Enter these values in the app’s settings.
Note. Even though the default reference width and height is 10 cm, you should always measure them yourself after printing the reference sheet. The actual reference width and height are often affected by different paper sizes and printer settings.
Position the leaf. Place the leaf (or leaves) you want to analyze on the white reference sheet, preferably within the reference points. To avoid shadows, flatten the leaf using a clear, non-glare acrylic sheet.
Set up the leaf nondestructively. If the leaf you want to measure is attached to the plant, it may be best to clamp a clear plastic cover over the leaf and background. Use a thick base, such as a clipboard. Cover up the petiole with a white piece of paper.
Take a picture and measure leaf area
Take a picture. Tap the camera button and position the phone to take a good picture. All four reference points must be visible. Steady the camera and take a picture.
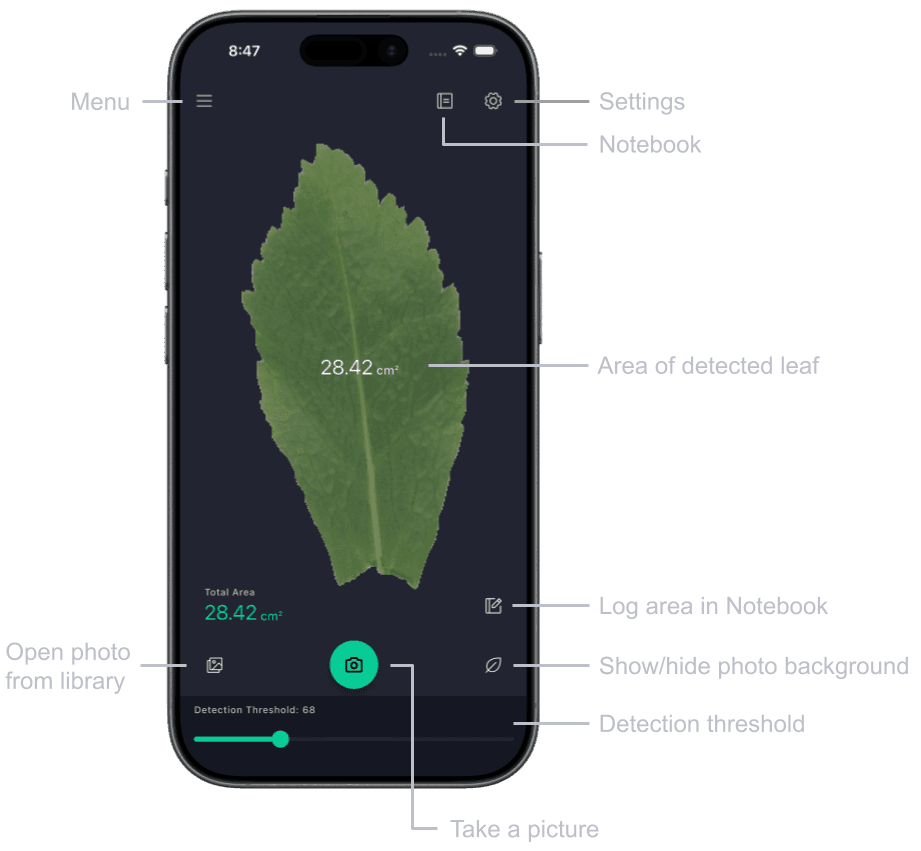
Measure the area. After taking a picture, a thin, red contour appears around the detected leaf (or leaves). However, if the background has been set to be hidden, then only the detected leaves are shown (without the background). Leaf holes are shown with blue contours. On top of each detected leaf, the calculated area is displayed. The detected reference points are shown with yellow contours.
Improve leaf detection. The leaf should have a good contrast against the white background. Avoid angles where the leaf shines and try to exclude background objects. If the app can’t detect all four reference markers, you’ll need to take another picture. If the contour is wrong or the leaf is not detected at all, you can adjust the detection threshold (see below).
Load an existing photo. Tap the photo library button and choose a photo.
Adjust the detection threshold
If the leaf contour doesn’t wrap the leaf correctly, adjust the detection threshold. Drag the slider at the bottom of the app to the left or right. As you change the threshold, the leaf contour is updated and a new area measurement is displayed.
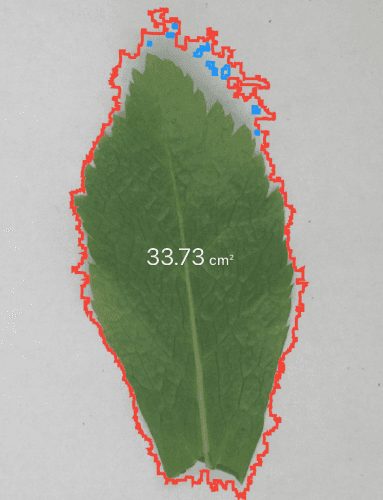
Bad
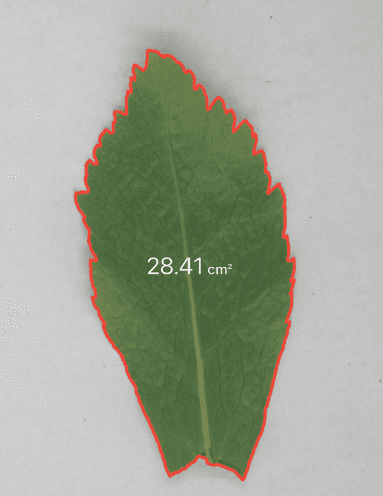
Good
Bad
Log area measurements
Log the area. Tap the Log button to log the current leaf area in the Notebook. The log will be added to the currently opened Collection (see below). The log icon adds a checkmark and changes color to indicate that the area was logged.
Show the Notebook. Tap the Notebook button to show the Notebook containing a list of all the areas logged. Each log entry has a Leaf ID, which is automatically incremented after an area is logged. Each entry also shows the timestamp, a small image of the leaf, and the measured area. If the Notebook is set to show an entry per photo (instead of by leaf), then the number of leaves is also shown.
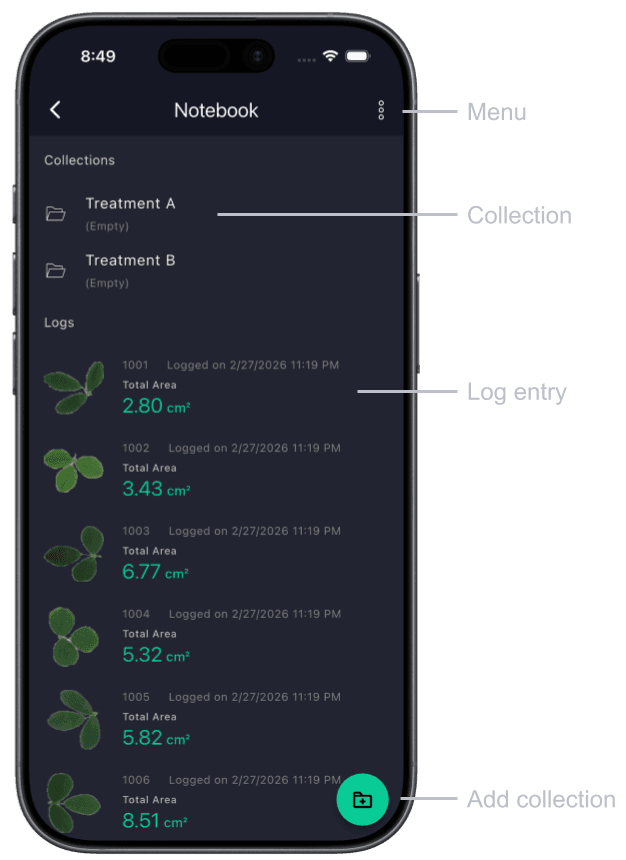
Log total area per photo. To group the logs by photo (relevant only when there are multiple leaves per photo), tap the Menu button and select Log total area per photo.
Calculate summary statistics. Tap the Menu button and select Show Statistics to calculate and show the summary statistics of all the logged leaf areas. Statistics include the count, sum, average, minimum, and maximum.
Export log entries as a CSV file. Tap the Menu button and select Export to CSV to export all log entries to a CSV file. Choose the app to which to export (for example, Gmail or Drive).
Rename log entries. Log entries are given a unique name (starting with 1001) that is automatically incremented. To rename a log entry, swipe the row to the left and then tap the Rename button. Enter the new name and tap OK.
Delete log entries. To delete a single log entry, swipe the row to the left and then tap the Delete button and confirm. To delete all log entries, tap the Menu button and select Clear Collection (or Delete Collection, if in a subcollection) and confirm. Deleting log entries, whether one or all, cannot be undone.
Add a collection. Tap the Add Collection button to create a new collection. Enter the collection’s name. The notebook will navigate to the new collection, and new log entries will be added to the current collection.
Navigate collections. To go to a parent collection, tap on the button for the parent collection (below the title bar). To go into a child collection, tap on the name of the child collection under the Collections section.
Delete collection(s). Under the Collections section, swipe the collection to delete, then tap on the Delete button. To delete all child collections that belong to the current collection, tap on the Menu button and tap on Clear Collections.
Settings
Change the units of measurement. Tap on the Units option and choose mm, cm, or in. All measures (area and length) will be automatically converted to the chosen units.
Specify the reference width and length. The reference width and length are the width and length of the square formed by the reference points. It is very important to enter these values in the Settings page before making any measurements of leaf areas. The reason both width and height must be entered is that there’s usually a small difference between them when the points are printed on paper.
Change the size of the photo. The photo, whether it’s taken with the camera or opened from your library, may be loaded at its original size, medium size, or small size. If the app feels sluggish with photos at their original size, try loading them at a smaller size.
Small area. Enter the minimum area to detect, as a percent of the largest leaf. This setting is useful when the photo contains many small artifacts that are not leaf tissue. A value around 5% is a good start.
Subtract hole area. If the area calculation should subtract the holes detected inside the leaf, turn this option on. When off, holes will not be subtracted from the total leaf area.
If there’s a region within the leaf that is incorrectly detected as a hole (for example, a bright region on the leaf), then you may want to temporarily turn off this option.
© 2026 Carlos Anderson. All rights reserved.